On Tuesday we had a lesson on creating emissive substances in Substance Painter and then brought an object from Substance into Unreal Engine for the first time.
To add an emissive material in substance painter, you simply have to add an emissive channel to the object, and then paint on the surface. Sometimes the emission is not very easy to see, however, so we applied the in-built game renderer in Substance Painter to view the object as we would in game. We added post effects like glare and luminance.
To export textures from substance painter, simply File>Export Textures. In this option there are many different ways or organising your textures. There is an in-built option for exporting to Unreal Engine that I will probably use the most, but it is pretty easy to make your own. Substance Painter and Unreal Engine allow for Texture Packing which is basically a more efficient way of exporting textures. Put simply, there are a few maps that we import into our game engine that are simply greyscale, and packing the textures allows us to put a singe greyscale image in just the Red channel of an RGB texture, another greyscale image in the Green channel and anther in the Blue, meaning that in one texture we can have a few different greyscale maps. This obviously only works for greyscale images, so it won’t work for normal maps or emissive maps, but it will work for roughness, meatless etc.
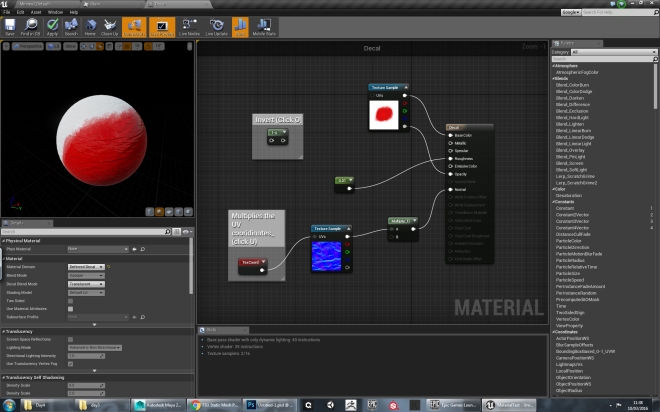
We then went into the material editor in Unreal Engine, where we learned how to create a material in Unreal using the maps we have exported from Substance Painter. We learned more about constants and multipliers etc. as well as how to create projected decals, a great tool that Unity was really missing.
In my own time, and in project time, I decided to re-bake the normal map for the vending machine that I created a few days ago, and to this time take advantage of the ability to bake objects separately using High and Low. This is an ability in Substance Painter where it will explode your mesh for you into its components, and bake files with a name ending in “high” onto files with the same name ending in “low”. So in my case I was baking “VendingMain_high” onto “VendingMain_low”. On paper this sounds amazing because it would correct a lot of baking errors but in actuality it caused me some serious, serious issues. Issues that took ages to figure out.

I encountered so many issues, so it’s probably easier to list them out in order of what I did. Substance painter was used for baking in every case:
- My original bake gave me this issue above. I tried baking a decimated high poly mesh from ZBrush onto a low poly mesh made in Maya. The result was this crazy disco-baa effect. After a long time of trying to figure out why this wasn’t working, Simon helped me, and said that when you decimate a mesh in ZBrush, it reorderes the normals, and their direction gets confused, resulting in a really strange effect. I had originally decimated the mesh so I could bring it into Maya to combine and rename there, and Maya has issues with the highest poly mesh.
- I then tried to export the high poly mesh directly from ZBrush and bake in Substance Painter again, but a different issue occurred. This time, the normal map produced was just a solid black, which is obviously incorrect. So it turns out that when ZBrush exports an FBX file, it doesn’t keep some of the naming information. Instead you have to export each high poly subtool as a separate mesh and then bake onto them.
- Again though, I had another issue here, where zbrush was still not creating the correct names for Substance, no matter what I did. So simon suggested importing my high-poly meshes into Maya separately. While these meshes are basically unusable in Maya, they can be renamed to the correct name, and then exported as one singular high poly mesh with correct names, even if it does take a long time.
- There result was a mesh that worked! Finally! But then, just to make issues worse, the UVs that I created for the Vending Machine mesh were causing issues, where the gradient was just too steep, and the edges were baking in correctly. So I then had to go re-UV the entire thing, and re-bake using the above steps.
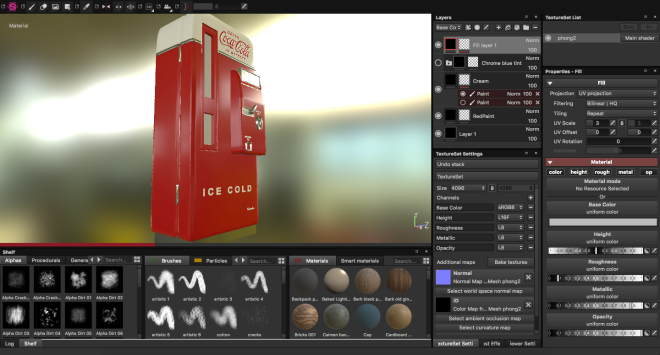
So that took way too long to figure out, but at least I figured it all out eventually, with a lot of help from Simon. This means I can now get on to texturing the thing in Substance Painter, finally.
Summary:
We brought our meshes and materials into Unreal Engine, and I solved the strange normal map dilemma that I was having for the last few days, where baking from “_high” to “_low” files wasn’t working in Substance Painter.
 The normal map for the object looks a bit strange, but I think it is just because my padding is high and the UV space is divided into a number of different objects.
 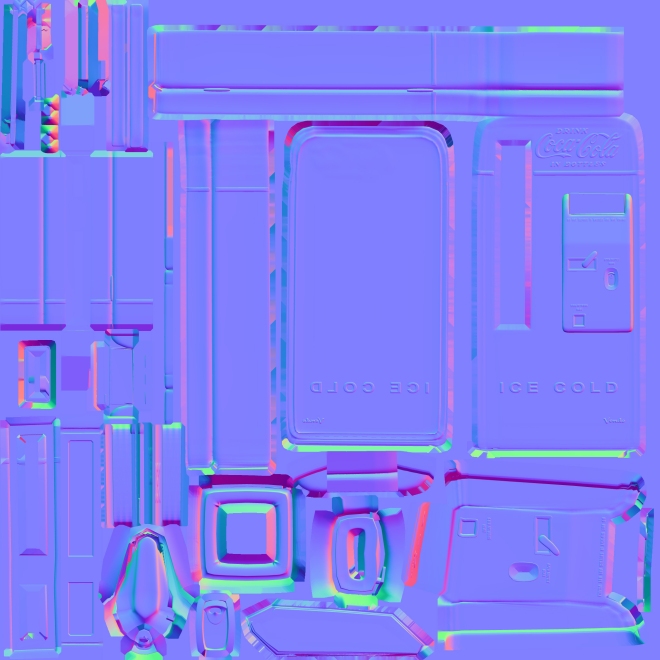 I will definitely have to look into it more, though. The normal map will also change soon, when I bring the object into Substance Painter in college to add details.