Friday was a really interesting day, where we were given a brief introduction to Substance Painter. We started by painting one of the demo assets that comes with the program, a biker, but we focused on his helmet mainly.
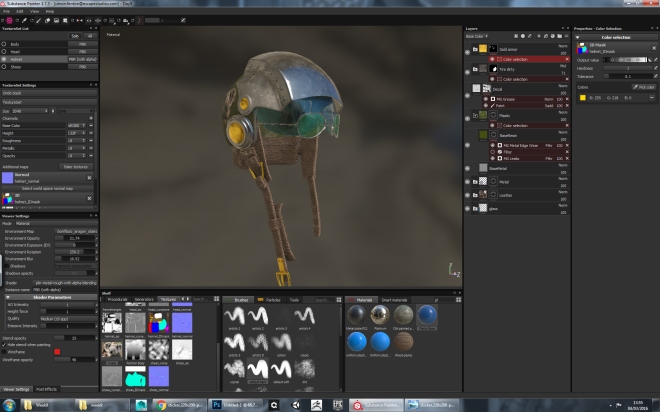
The really cool thing about this program is that you don’t really paint colour, you paint materials. You can, of course, alter the colour and stats of each material, but every material has a series of sliders and values that can dynamically change their appearance. The Smart Materials already installed on the software are particularly amazing, because you can edit everything – Like if you apply a wood material you can simply change the amount of knots in the wood, or how close the grain is. Its amazing, really, and makes texturing a breeze.
Substance painter actually paints in every texture channel simultaneously, so when you are painting a material, you are also altering the height map, cavity map etc.
And the physical effects (like the amazing particle painting system) it dynamically interacts with each map.
We worked using the Metal/Rough workflow, like we did in Unity, but Substance Painter is also capable of working in the Spec/Gloss workflow.
Substance Painter is an amazing program in general, but I particularly appreciate how games-focused it is, particularly with regards physically based shaders.
A couple of small things to note.
- You should only paint on the GAME READY model, not the high poly model.
- You can affect just one channel, for example height, my deselecting the others from the menu. This means you have a serious amount of control over your work.
- It uses a similar layer system to Photoshop, and you can actually Overlay or Multiply your layer, just like in Photoshop.
- You can actually raise and lower the texture resolution non-destructively, meaning that you will never lose data by testing it at a lower texture resolution, which is really handy.
- Layers can have masks, just like in Photoshop, but you can even select masks by UV Group and Colour Selection from a colour map made in Maya.
- There are things called “Generators” where you can add sort of smart masks to objects, for example we used the “Edge Wear” one to automatically add a worn effect to all the edges of the object. It determines the edge by examining the model, as well as the ambient occlusion etc.
It’s an amazing program, but unfortunately is quite graphics card intensive, so my laptop can’t really handle it.
I then want on to do some work on my Diner assets. I modelled and sculpted a vintage 1950s CocaCola vending machine, using a lot of reference that I found online.


I modelled the main frame for the machine in Maya, like the rest of my models, but then brought it into ZBrush to add some normal information. I didn’t really add much wear and tear to this model, but instead added a lot of inflated text, like in the reference image. I did this using the mask technique that we looked at already, and it gave a pretty convincing result. Below is one of the reference images I used, as well as the alphas that I created for masking and inflating the text in zbrush. All alphas were created in Photoshop in 16bit with a soft blur on the outside to add a smooth raised area in Zbrush.I had to subdivide the models a great deal to get enough resolution to rase the text accurately.


I then went on to model this fridge in Maya, and again bring it into ZBrush to add detail that I will hopefully bake into the normal map later.


Again, I modelled the basic shape in Maya, but then brought it into ZBrush to add the concavity detail, as well as the “Big Chill” logo and the vent detail on the base of the fridge. Here are the alphas I created to again create a mask in ZBrush and then inflate.


And this is the result:


Finally, I went on to model the kitchen stove. I started by researching industrial stoves from the 1950s. While I couldn’t find the right stove to model on, I found a photograph of a chef from Eric and Sharlene’s online blog (Link to their Blog) and the cooker he is using is almost exactly what I wanted to recreate.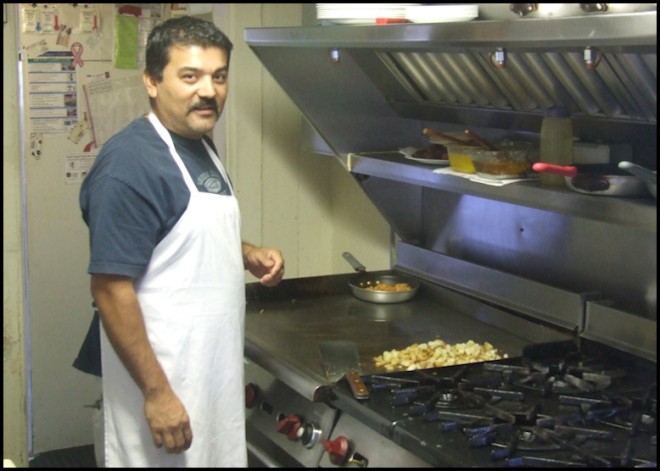
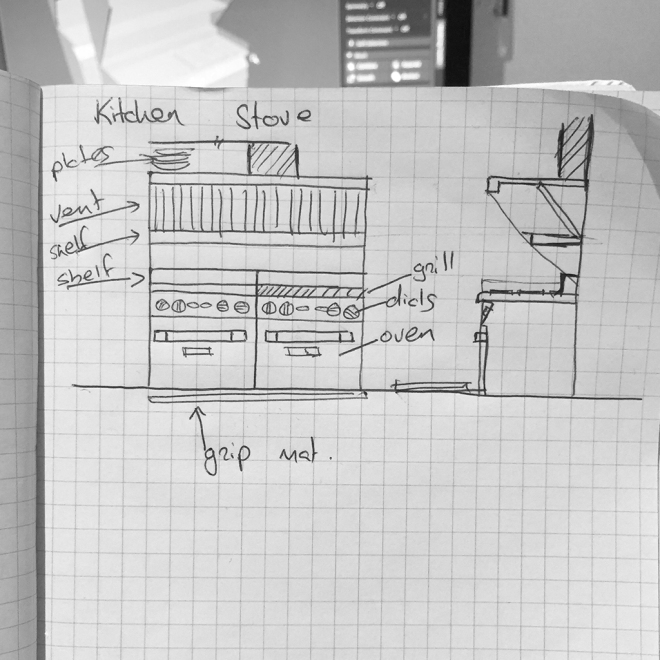
So I went on and did my own quick sketch to block out the proportions and parts of the stove that I wanted to in.
I then went on and created a blockout in Maya :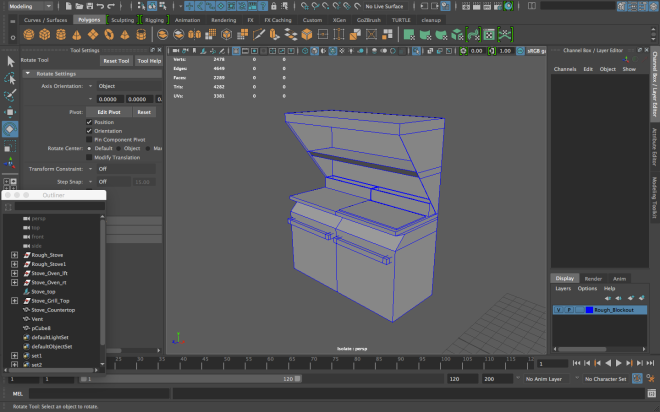 I then templates this blockout, and modelled the stove to it’s proportions.


It’s not finished, by ant means, but it’d on its way. I think this is an asset that I probably won’t bring into ZBrush, but I can see a serious use of some of Substance Painter’s smart materials and particle brushes, particularly the grease and flame ones. I may bring it into ZBrush and add some rough wear if I have time, too.
Summary:
Intro to the painting beast that is Substance Painter. I also modelled some more assets for my diner – Cooker, Fridge, Vending Machine.
